Red Pitaya v1.1 quick start
Prereqs:
- blank 8 GB or larger SD card
- Ethernet cable to network
- 5 V 2 A microUSB power adapter
Quick Start:
Download Red Pitaya OS zip. Login if needed.
Before and after inserting the micro SD card into the laptop, type
lsblkThe new drive is the SD card. Be sure you have the right one because the next command erases the drive! lets assume it’s /dev/mmcblk0
Extract .img.zip to SD card by
unzip -p red_pitaya*.img.zip | sudo dd of=/dev/mmcblk0 bs=4Mthis will take several minutes without progress indicator e.g. 4000/10/60 = 6.6 minutes.
Type sync to be sure SD card is done writing.
Insert microSD card into Red Pitaya (contacts facing away from PCB)
Power up Red Pitaya with Micro USB jack nearest board edge.
The flashing LED settle down in 30 seconds to constant green and blue and double-flashing red (or, single flashing orange).
Accessing the Red Pitaya via web browser shows the graphical apps for oscilloscope, spectrum analyzer, and the App Store for free apps like SDR, VNA, etc. You can also connect to the Red Pitaya via SSH or serial port console.
Connecting to Red Pitaya over Ethernet: the Red Pitaya uses Avahi so that you typically don’t have to search for its IP addresses.
The Avahi address is found as follows.
Use the last 6 characters of the MAC address on the Red Pitaya Ethernet jack (say 12:34:56), and on laptop web browser http://rp-123456.local.
If you have trouble, try nmap to find the IP address of the Red Pitaya.
SSH login/password: root/root
Serial port: if you can’t connect over Ethernet to Red Pitaya, you can plug a standard micro-USB cable from your PC to the Red Pitaya micro USB port next to the Ethernet jack. Find the serial port the Red Pitaya is on via
ls /dev/ttyUSB*Probably it’s on /dev/ttyUSB0.
Then use
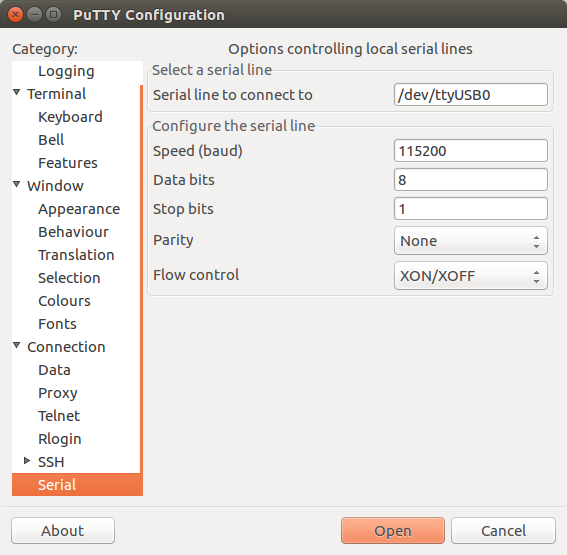
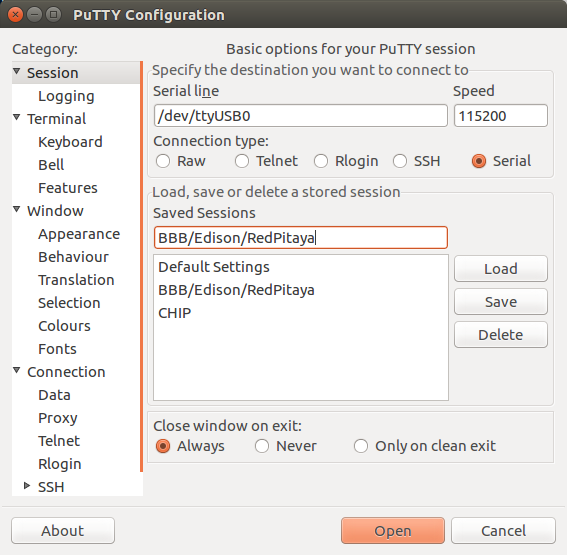
PuTTY
to connect to the Red Pitaya with the commonly used settings in these figures below:

PuTTY serial config for Red Pitaya

PuTTY serial config for Red Pitaya
For Pavel Demin’s ecosystem*.zip images for Red Pitaya ham radio, just extract the .zip file to the blank FAT32 formatted SD card.
The ecosystem*.zip contains numerous files and directories, unlike the single .img file in the procedure above.